
It is possible to synchronise 2 Splider stacks so that 1 Splider stack acts as the 'navigation' for a second Splider stack. This has various uses but the most obvious one might be to build a 'thumbnail slider'. Visit this demo page for a few different examples.
To create a synced set of Splider stacks
You need 2 Splider stacks set to be in sync. 1 to act as the Navigation and the other to hold the content. Each of these Splider stacks should contain the same amount of slides (i.e. each slide should have a content and a navigation version).
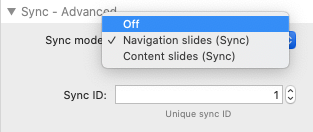
For the Splider that you want to act as the Navigation slider you should select 'Navigation slides (Sync)' and for the Splider that you want to be controlled by the Navigation slider you should select 'Content slides (Sync)'.
For the syncing to occur you need to make sure that each of these Splider stacks shares the same unique Sync ID.
That is all that is required.
Notes / Tips
It doesn't matter where on the page you place the synced Navigation Splider stack. It could be above, below or to the side of the Content Splider stack. It could even be at completely different ends of the web page (if there is a use case for that I don't know of it!).
You will likely want to hide the Navigation arrows and Pagination from at least one of the two sliders (if not them both).
If you are building a thumbnail slider then it is often worth building 1 stack and then duplicating it - as essentially the 2 sliders each hold the same content/images. It is worth using warehoused images for this (or site images) as using local images would load 2 versions of the same image. Alternatively, you could use a much smaller version of each image in the Navigation / Thumbnail slider.
Project file
Demo file is built using Splider 1 and will be updated to Splider 2 version asap. In meantime you can open with Splider 1 (included with v2) to view settings if you want to recreate. View our article about migrating a slider from Splider 1 to Splider 2.