
Splider is built upon splidejs which offers an API to enable you to extend functionality by using your own javascript. As of v1.3.1 of Splider stack this functionality is now available to you to implement in your RW projects. Here is a demo page of some of the functionality that it might allow.
NOTE: This functionality is intended only for advanced users. Beyond what is available in this Knowledge Base page, the Splide web pages and the demo project this aspect of Splider is unsupported by Shaking the Habitual.
Splide API
You can read about all of the available methods over on the Splide API documentation. There is no point in me replicating that here. The key differences to note are:
- All of the example code on the Splide pages use the variable 'splide'. With Splider, the variable name that you will need to reference will depend on the Splider ID that you set in the stack settings (more information below)
- Sliders built on the Splide examples tend to use <li> elements, in Splider we use <div> - this will only be relevant if you are looking to dynamically add slides to you’re Splider instance
- Splider stack mounts the slider and so you shouldn't need to use the mount command (unless you have used the destroy method). i.e. the following part is already done for you when using Splider:
var splide = new Splide( '#splide' ).mount();(the only difference being the variable name as detailed above)
Splider ID
To use any of this functionality with Splider you need to first set your Splider stack to have a unique ID. This is done in the 'Advanced' section of the settings.
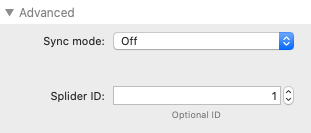
In the image above we have set a Splider ID of 1 (the default is 0). This would result in a variable of splider1 being created and it is this that you would need to use when referencing this Splider instance in your code. The examples below will use this variable name in the code. NOTE: If you are using a synced slider then you would instead need to use a variable of syncNav1.
Examples
I'll just go through a few simple examples here (all of which are available in the demo file).
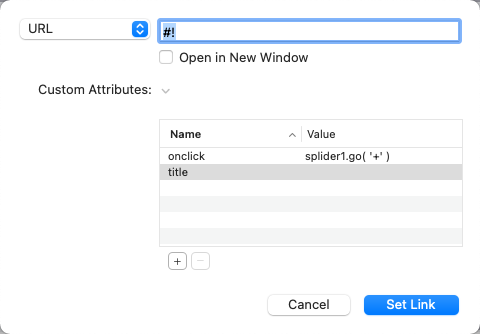
- To create a custom button that lets the user go to the next slide you can add this as on onclick attribute on the button:
splider1.go( '+' ) - To create a custom button that lets the user go to the previous slide you can add this as on onclick attribute on the button:
splider1.go( '-' ); - To go to a particular slide you can add this:
splider1.go( 3 ). This will take the user to slide number 4 (the index starts at 0). - To adjust Splider options you can add this:
splider1.options = { perPage: 1 }. See the available options.
These examples all use a simple command in the link. If you need to do multiple things at one time then you could group them into a javascript function and have the button run that. The example of adding / removing slides in the demo project uses an event listener to trigger a javascript function whenever a button with a particular class has been clicked. There are numerous ways that you can do all of this.
Tips / Ideas
You could use a Splide event listener so that you could (for example) set a custom 'Previous' button to become inactive if the index of the active slide = 0. Or the Next button to become inactive if the index = length - 1.
You could possibly even add some (e.g.) php code to link to a csv file and create an array of values that you could then loop through and create a slide for each row.
If you come up with some nice use cases / examples of using this functionality then please consider sharing on the RW4ALL forum.
Project file
Demo file is built using Splider 1 and will be updated to Splider 2 version asap. In meantime you can open with Splider 1 (included with v2) to view settings if you want to recreate. View our article about migrating a slider from Splider 1 to Splider 2.