
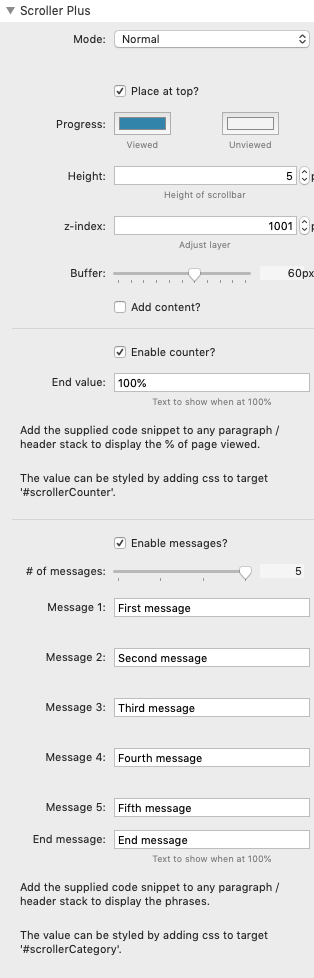
Mode
There are 5 modes to choose from. These are all detailed on this page and there are links to view example pages using each.
NB: 2 of the modes use two lines and are therefore better suited to use when Scroller Plus stack has been set to contain content (such as a Navigation Bar).
Place at top
If you want the bar to be placed at the top of the page then leave the box ticked. This is the default behaviour. If you'd rather have it at the bottom of the page then deselect this box.
Progress
Select the colours that you want to use for viewed and unviewed. The bar will start at 100% of the unviewed colour and the viewed colour will gradually expand across the page until the bottom of the web page is reached.
Note: You can make the unviewed colour transparent to just show a single scrolling bar.
Height
Set the height that you want the bar to be.
Note: If you are using a sticky or fixed navigation bar then you might want to add some margin to the top of that to allow for the height of the scroller bar.
Z-index
If you need to bring the scroller bar above other elements on the page (i.e. navigation bars) then you can adjust this value accordingly.
Buffer
On mobile devices, depending on what bars etc are (or become) visible/hidden, it can result in it being difficult to hit 100% at the bottom of the page. Adding a buffer ensures that 100% will be hit before the absolute bottom of the page. The difference is largely negligible on desktop devices.
A default value of 60px is added as default but this can be adjusted/removed if desired.
Add content
If selected, this option allows you to add any other stacks to it. These would appear above the fixed scroll line. You could add a logo or a title.
Note: This can work especially well for navigation bars though it is important that the nav bar is set to 'static' as the scroller stack will fix it to the top.
Enable counter
Selecting this option allows you to add a code snippet somewhere on the page that will allow you to show your web page visitor how much of the page they have viewed (in percent).
You should have received the code snippet file with the stack download. Simply add this snippet into any paragraph or header stack that you wish to contain the counter. For obvious reasons it is beneficial to use this in an element that is fixed on the page. For reference, the snippet is:
<span id="scrollerCounter">0%</span>
The example at the bottom of the product page uses the following text/code within a paragraph stack:
'You have viewed <span id="scrollerCounter">0%</span> of the page'
You can add some styling to the counter by adding some custom CSS to the page. You may want to do this if you are adding normal text each side of the counter so that you can make the counter stand out a bit more. For example, to make the counter bold and pink you might use:
#scrollerCounter {
    font-weight: bold;
    color: pink;
}
End value
You can opt to show something other than the default '100%' when the bottom of the page is reached. You might for example wish to add some text (e.g. 'You made it!' or 'Finished!').
Enable messages
Selecting this option allows you to add a code snippet somewhere on the page that will allow you to show your web page visitor different messages as they scroll down the page.
You should have recieved the code snippet file with the stack download. Simply add this snippet into any paragraph or header stack that you wish to contain the counter. For obvious reasons it is beneficial to use this in an element that is fixed on the page. For reference, the snippet is:
<span id="scrollerMessage">Scroller message</span>
# of messages
You can choose to display between 2 and 5 messages to the user as they scroll down the screen.
2 messages will split the content into 2 and therefore message 1 will be shown in the top half of the page and message 2 will be shown when the bottom half of the page has been reached.
Likewise, 3 messages will split the full length of the page into thirds.
And so on.
Messages 1 - 5
You can enter whatever text you wish to use for your messages in these boxes.
NB: Only the amount of messages selected previously will be used.
End message
This piece of text is shown once 100% of the page has been viewed.