
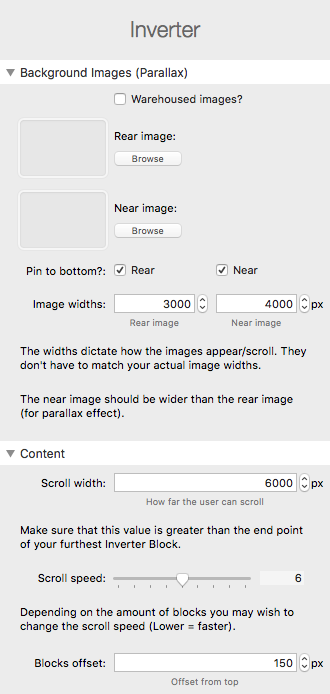
Warehoused images?
If you wish to link to remote images as opposed to using local images then check this box. You will then be able to set a url link to your images.
Rear image
To create a parallax effect, 2 images can be used in Inverter stack. The 'rear' image is the one that is displayed furthest back in layers to give the impression that the image is nearer the horizon.
Note: You should use wide images for this. A recommended size is 3000px x 800px.
If you want an image to cover the whole height of the screen then you would maybe want an image of 3000px x 1200px.
Near image
The 'near' image is the one that is displayed closer to the front (i.e. nearer you than the horizon).
Note: You should use an even wider image for this. A recommended size is 4500px x 600px.
You should also ensure that the near image has transparent sections so that the rear image can be seen behind.
Pin to bottom?
The default is that both images are pinned to the bottom of the screen. If either of the images that you are using would look better being pinned to the top of the screen then you can uncheck this box.
Image widths
The image widths allow you to manually set how wide you want them to appear (regardless of what size they actually are). The values that you choose will affect how they appear when scrolling. The default values will likely be fine but feel free to experiment for different effects.
Note: For the parallax effect to work as it should then the rear image should be less wide than the near image. This is what gives a natural looking differences in speed when scrolling. Note too that the content section should be wider than both of these images.
Scroll width
This determines what width the content (front layer) should be. This value is how far to the right that the user will be able to scroll.
Note: This value should be greater than the image widths. It should also be greater than the end point of your furthest content block.
Scroll speed
The width of your content will affect how fast / slow the scroll action appears. If it seems too fast or slow then you can adjust it using this slider.
Note: The lower the number the faster the speed (and vice versa).
Blocks offset
This setting allows you to determine how far from the top of the screen you want the top of your content blocks to be.
Note: You will want to keep this value reasonably small as any content that does not fit on the page will be clipped from the bottom. You therefore do not want to 'waste' too much space at the top.