
Splider stack offers a number of extensions that are available to you to extend what is possible from the default settings. These aren't enabled by default as they all require additional code to be added to the page (albeit a very small and efficient amount of code).
Extensions - Load and apply
In order for any desired extensions to be available to use they must be first 'loaded' (to the page) and then 'applied' (to any instance of Splider stack where you want to use the extension functionality).
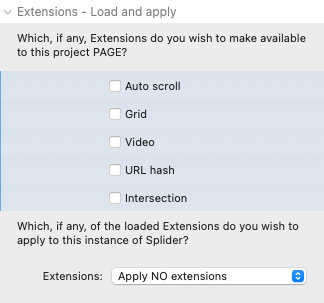
There are 5 extensions currently available with Splider stack. Select any that you want to be available.
- Auto scroll: this enables the slider to continually scroll in a smooth manner. it differs from autoplay in that it does not pause when a slide becomes active (though it will still pause if hovered over)
- Grid: this extension enables you to set out your slides in a grid layout
- Video: this extension needs to be activated if you are using the Splider Video slide stack
- URL hash: this option allows you to navigate directly to particular slides by utilising a hash value in the url
- Intersection: this extension acts as a trigger that allows you to either start or stop certain actions (e.g. autoscroll, autoplay, video) when a slider enters / exits the viewport.
LOAD
The stack options for these are in blue as they are 'page scoped' settings. i.e. if you set these in one Splider stack then the same settings will be pulled into all Splider stacks on that page. This is because checking these boxes loads the extension on to the page and makes them available to all Splider stacks on the page.
IMPORTANT: As these controls are scoped to the page that they have been activated on, if you move an instance of Splider to a new page you will have to make sure that new page has the required extensions loaded too!
APPLY
Once the required extensions have been loaded to the page you then need to specify which (if any) you want each instance of Splider on the page to apply. The default is for No extensions to be applied but you can opt to apply ALL extensions or Select specific ones.
Extension - Auto scroll
Note: for the Auto scroll settings to be activated the Auto scroll extension stack should be loaded to the page and applied to the desired instance(s) of Splider.
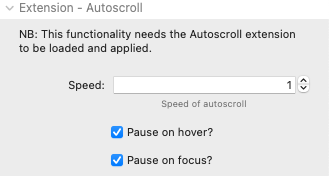
Speed: The speed to the horizontal scroll. Recommended maximum would be around 3 though the optimal speed will differ depending on how many slides are in view at one time.
Pause on hover: Option to have the slider pause if the user hovers their mouse over it (recommended for sliders that have any content within them).
Pause on focus: Option to pause the auto scroll if the slider in question receives focus (i.e. via an interaction or via the keyboard).
Extension - Grid
Note: for the grid settings to be activated the Grid extension stack should be loaded to the page and applied to the desired instance(s) of Splider.
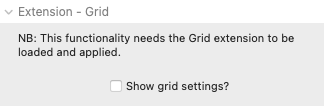
Show grid settings: If enabled then additional settings are activated and shown within the regular Slide setup (and breakpoint) settings groups. For more information about building slider grids please refer to our dedicated grid tutorial.
Extension - Video
This extension works in conjunction with the Splider Video slide type. For the following Video settings to be activated the Video extension stack should be loaded to the page and applied to the desired instance(s) of Splider - i.e. any that make use of the dedicated Splider Video stacks.
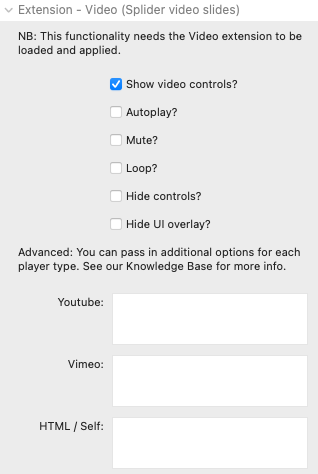
Show video controls: This option simply shows / hides the other options in this stack. As there are quite a few settings the default is to have them hidden to save space.
Autoplay: Set this to have the video begin playing when the slide is brought into view / made active. (note: most browsers will also need the following Mute setting to be activated for this to work).
Mute: Have the video muted by default.
Loop: Have the video auto-loop (i.e. repeat and keep repeating when it reaches the end)
Hide controls: You can hide some video control settings by enabling this option
Hide UI overlay: You can hide any UI overlay - including the play button with this option
Player options (Advanced): You can add in any additional player options for each player type. These should be added in the following format: playsinline: true, You can use the following links to find the available options for each player type:
Find out more about using video slides.
Extension - Intersection
Note: for the Intersection settings to be activated the Intersection extension stack should be loaded to the page and applied to the desired instance(s) of Splider.
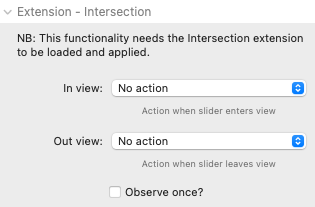
In view: Action to take when the instance of Splider comes into view in the viewport. Options are: Start autoplay, Pause autoplay, Start auto scroll, Pause auto scroll, Start video, Pause video
Out view: Action to take when the instance of Splider leaves the viewport. Options are: Start autoplay, Pause autoplay, Start auto scroll, Pause auto scroll, Start video, Pause video
Observe once: This option just activates the In view action one time and triggers no further actions when the slider enters/leaves the viewport.
Extension - URL hash
The URL Hash extension has no settings in the main Splider stack. If you wish to use it make sure it is enabled (loaded and applied) and that the individual slide stacks have been given unique IDs. Find out more about using the URL hash option.