
Our Magic Mouse stack lets you apply stunning, modern effects to cursors and also their hover effects when over particular elements.
Stack settings
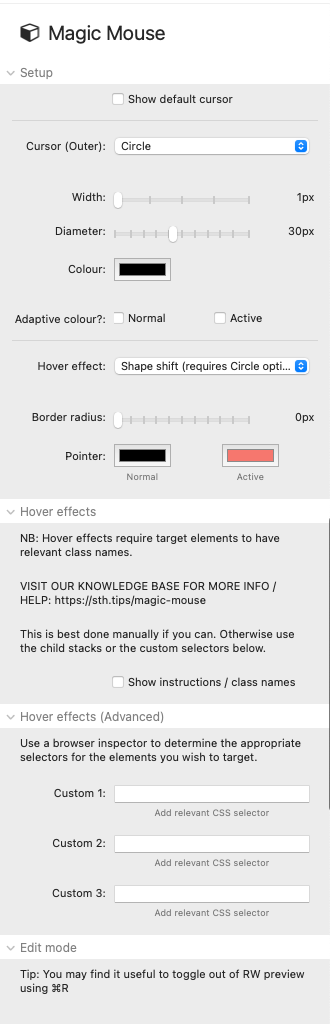
Show default cursor: If this option is selected then it will show the default cursor along with the new Magic Mouse cursor. (Tip: If using this option then you may want to choose a transparent colour for the normal pointer dot)
Cursor (Outer): You can opt to have a circular cursor or have no outer cursor. (Note: If you want to use the Shape Shift hover effect then you need to select the Circle option here).
Width: If using the Circle cursor then you can set the width of the line/border of the circle.
Diameter: If using the Circle cursor then you can set the diameter of the circle.
Colour: You can set the colour of the circle's border here. Note: This colour is overridden if you opt for Adaptive colours (see below).
Adaptive colour?: If you select this option then the colour of the cursor will adapt to whatever is behind the cursor. This is useful if you have a site with dark and light sections. You can select for the adaptive colour to be applied to the cursor in normal use and / or when it is hovering over a target item. If using adaptive colour then the colour value set in the setting above will be ignored.
Show instructions: This option will show some usage instructions within the page. It will also reveal the 2 required CSS class names that need to be used (which is useful for copying and pasting them!).
Hover effect (Shape shift): The shape shift effect transforms the circular cursor into a rectangle (or rounded rectangle - via the Border radius setting) when a target element is hovered over. It requires the Circle option to be selected in the Cursor (Outer) setting.
Hover effect (Pointer blur): The pointer blur effect transforms the inner pointer (dot) to a ring (diameter can be set in additional setting)
Hover effect (Pointer overlay): The pointer overlay turns the pointer dot into a circle (diameter can be set in additional setting). You can set this to have a mix-blend-mode of either none or 'difference'. If using 'none' then you will need to set the active colour to be somewhat transparent.
Pointer colours: You can set colours for the pointer dot in its normal state and active state (active state is applied if it is over a targeted element).
Hover effects (Advanced) Custom selectors: If there are stacks that you wish to target with a hover effect (but that you cannot manually add the required class names to and that there isn't a Magic Mouse child stack that will target them) you can add your own custom selectors. You will need to know how to use the browser inspector for this so that you can identify the appropriate selectors (see our video example here).
Setting target elements for hover effects
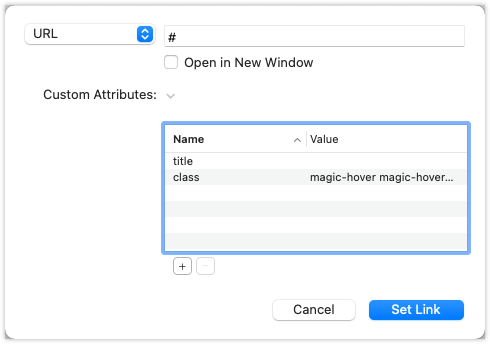
The main Magic Mouse stack will set up how your cursor looks. The second element of the stack is to apply hover effects to particular items (most commonly links and / or navigation elements). We mark our desired target elements by adding certain class names into the html. The 2 class names that need to be added are magic-hover magic-hover__square.
There are 2 ways to do this - either manually adding the class names into the elements that you want to target (this is the best method though may not always be possible) or by using the dedicated 'child' stacks (which add the same class names via JavaScript when the page loads).
Manually setting class names
If you are able to set class names manually (i.e. by adding the class names noted above into the link settings for your buttons / links etc) then it is preferable as it means you can target individual elements and it also saves the Magic Mouse stack having to run some JavaScript to do the same thing. For certain things though (RW navigation links etc) then you will likely not have the ability to do this in which case you should use the child stack approach.
Some stacks have custom CSS fields where you can add these class names however it will generally need to be added to the actual link element which you can do like so:
Note: The built in Stacks Custom CSS box will not generally work for this as that applies the classes to the wrapper of whatever stack is being used as opposed to the actual element itself.
Setting class names via the child stacks
There are various 'child' stacks included with Magic Mouse stack - these can be accessed by clicking on the blue plus button in the Edit window of stacks.
These child stacks have been set up to target particular elements and automatically apply the required classes for you. E.g. the Navigation links stack will run some JavaScript that will find any elements matching the selector nav li (which is any list items in a nav element) and apply the class to each of them. Likewise the Button stack will find any buttons with a class of button and apply it to them.
Note: If using any of the pre-defined child stacks then it will 'blanket' apply the classes to all matching elements - meaning you cannot control which ones do / do not get the effect. If you want a bit more control but still want the classes to be applied automatically then you can use either 'Magic' child stack or the Custom selectors option.
Magic Mouse in frameworks
We have begun to pull together some support resources detailing the use of Magic Mouse in different frameworks (as each framework is set up differently in how they build different elements). We are continually adding to these pages based on user questions / feedback.